
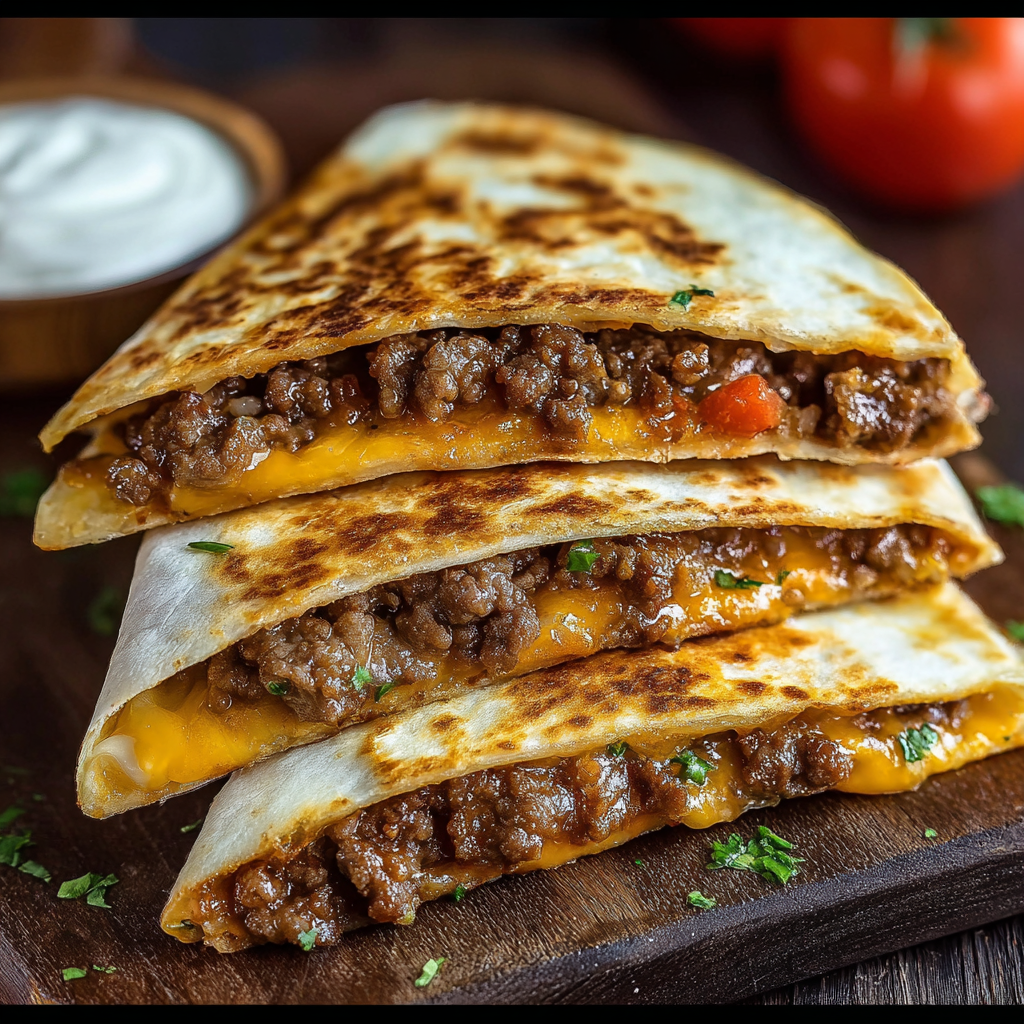
Smashburger Quesadillas

A joyful crossover of burger and quesadilla: seasoned ground beef smashed into a tortilla, melted cheese, and crispy golden edges for a fast, satisfying meal.

This smashburger quesadilla is the kind of dish that changed the way I think about weeknight dinners. I first made this mashup on a busy Friday when I had a craving for burgers but only a skillet and a handful of pantry staples. The result was unexpectedly delightful: beef browned and seasoned, pressed thin against a warm flour tortilla so the meat caramelized and the edges crisped. The gooey cheese in the fold knit everything together into a handheld, messy, irresistible meal. Ever since that night it has become a favorite when time is short and appetite is not.
The appeal is simple and immediate. Texturally you get the contrast of crisp tortilla edges and a slightly chewy center with pockets of melty cheese. Flavorwise the seasoned ground beef sings like a classic smashburger with a hint of garlic and black pepper, and optional pickles and diced onions add that familiar burger bite. I love that the technique is flexible: you can scale the filling up, switch cheeses, or turn this into a vegetarian version with plant-based crumbles. For family dinners, game days, or a last-minute guest, it delivers big satisfaction with minimal fuss.
Why You'll Love This Recipe
- This cooks fast and clean in one skillet or on a griddle, ready in about 20 minutes from start to finish.
- It uses pantry staples and easily sourced ingredients such as ground beef, flour tortillas, and shredded cheese so it is perfect for weeknights.
- Make-ahead potential is excellent: you can cook the beef earlier and assemble or reheat assembled quesadillas quickly.
- Crowd-pleasing and adaptable; swap cheeses or add pickles and sauce to mirror your favorite burger profile.
- Minimal equipment needed and straightforward technique makes it ideal for cooks of any skill level.
When I first served these, my partner declared them a “fast food upgrade.” Friends at a small game night devoured them while asking for seconds. The combination of melty cheese and crisped tortilla edges with seasoned beef feels indulgent while being remarkably simple to pull off, which is why I keep this formula in my weekly rotation.
Ingredients
- Ground beef, 1 pound: Choose 80/20 for the best balance of flavor and moisture. The fat helps caramelize the meat when it hits the hot pan and prevents dryness. Use a fresh pack from a trusted brand or your butcher.
- Seasonings: Salt and freshly ground black pepper are essential; add 1/2 teaspoon garlic powder for background savoriness. Adjust salt to taste after cooking since cheese and any sauce add saltiness.
- Flour tortillas, 4 large: Look for tortillas labeled 10 to 12 inches for easy folding. Fresh, pliable tortillas work best; stale ones tear when folding.
- Shredded cheese, 1 cup: Use sharp cheddar or American cheese for classic melt. Shredded cheddar yields more pronounced flavor while American gives ultra-silky melt.
- Optional toppings: Thinly sliced pickles, diced white or red onion, and a simple burger sauce (equal parts mayonnaise and ketchup with a splash of pickle brine) elevate the profile.
Instructions
Heat the Pan:Preheat a heavy skillet or griddle over medium-high heat for about three minutes. The surface should be hot enough to sizzle when a drop of water is flicked on it but not smoking. Use a cast-iron skillet if you have one for superior browning.Season and Portion the Beef:Divide the ground beef into four equal portions. Lightly season each portion with salt, pepper, and garlic powder. Avoid overworking the meat to keep it tender when cooked.Press the Beef onto the Tortilla:Lay a tortilla flat and place a small handful of seasoned beef on one half. Using the back of a spatula or a small press, smash the meat thinly and evenly across the tortilla half so it resembles a thin burger patty. The goal is even contact with the hot surface to develop a savory crust.Cook Beef Side Down:Place the tortilla onto the hot skillet with the beef side down. Cook for two to three minutes without moving. Look for deep browning and fat rendering around the edges. This caramelization gives you the signature smashburger flavor.Flip, Add Cheese and Fold:Flip the tortilla so the cooked beef faces up. Immediately sprinkle about 1/4 cup of shredded cheese over the beef and fold the tortilla over to enclose the filling. Press gently with your spatula.Grill Both Sides Until Crispy:Cook another one to two minutes per side, pressing occasionally, until the tortilla is golden and the cheese is fully melted. Adjust heat as needed to avoid burning while achieving an even crisp.Slice and Serve:Transfer to a cutting board, let rest for 30 seconds to firm up, then slice into wedges. Serve with pickles, diced onions, and burger sauce on the side for dipping or drizzling.
You Must Know
- This yields four handheld portions with approximately 450 calories each and stores well refrigerated for up to three days.
- Freezing fully assembled items is possible for up to one month; reheat from frozen in a moderate oven for best texture.
- High in protein and fat because of the beef and cheese; adjust portions or use leaner beef for a lighter plate.
- The crisping technique is key: medium-high heat delivers the best caramelization without drying the filling.
My favorite aspect of this mashup is how it revives the nostalgia of burger night with a hands-on, casual finish. When friends visit, I sometimes set up a small assembly station with toppings and let everyone customize their wedges. The first time I did that, someone compared it to a portable burger pizza, and the idea stuck because it captures the essence of both experiences.
Storage Tips
To refrigerate, cool the wedges to room temperature then place in an airtight container. They will keep for up to three days. For longer storage, wrap individual folded tortillas tightly in plastic wrap and place in a freezer bag; they keep up to one month. Reheat refrigerated pieces in a skillet over low heat to re-crisp the tortilla and melt the cheese. For frozen pieces, reheat in a 350 degrees Fahrenheit oven for about 15 minutes or until heated through, flipping once for even browning. Avoid the microwave if you want to preserve the crisp texture; use it only in a pinch.
Ingredient Substitutions
To change the profile, swap ground beef for ground turkey or pulled rotisserie chicken for a lighter option; expect less fat and a milder flavor with turkey so increase seasoning. For a vegetarian version, use crumbled firm tofu or seasoned plant-based ground meat and add a teaspoon of vegetable oil to help with browning. Replace flour tortillas with corn tortillas for a different texture, though smaller corn tortillas require two per quesadilla. Try pepper jack for heat or mozzarella for a neutral, stretchy melt. If avoiding dairy, use vegan cheese and a plant-based ground substitute.
Serving Suggestions
Serve wedges with small bowls of burger sauce, ketchup, mustard, or spicy mayo. Add a side of crisp fries or a simple green salad to round out the meal. For a party, arrange wedges on a platter garnished with thinly sliced pickles and chopped scallions. A quick slaw with a tangy dressing provides a refreshing contrast to the rich, melty interior.
Cultural Background
This dish blends the American smashburger tradition with the Mexican quesadilla concept to create a hybrid that honors both origins. The smash technique has roots in diner-style burger preparation where pressing patties ensures even browning and a caramelized crust. Folding that caramelized meat into a tortilla and adding cheese nods to Mexican and Tex-Mex comfort food. The result is part street food ingenuity and part late-night diner pleasure, reflecting an era of playful culinary mashups.
Seasonal Adaptations
In summer, add charred corn and a cilantro-lime crema for brightness. In fall, swap cheddar for smoked gouda and top with caramelized onions for a cozy twist. For holiday gatherings, make a larger batch and serve bite-sized wedges with holiday-themed dipping sauces. The core method adapts easily to seasonal produce and flavors without changing cooking technique.
Meal Prep Tips
Cook the seasoned beef ahead of time and store it in the refrigerator for up to three days. When ready to assemble, warm the beef in a skillet until just heated, then place on the tortilla and finish as directed. This reduces active time to minutes and is ideal for packed lunches or quick dinners. Store toppings separately to maintain texture and assemble just before reheating to keep the exterior crisp.
Smashburger quesadillas take minimal time but deliver maximum satisfaction. Whether you keep them classic or adapt them with seasonal ingredients, they remain an easy crowd pleaser that encourages playful customization. Give them a try and enjoy the comfortable contrast of crisp and melty in every bite.
Pro Tips
Press the beef thinly and evenly to maximize contact with the hot pan for the best caramelization.
Use a cast-iron skillet or seasoned griddle for superior browning and even heat distribution.
Let the assembled quesadilla rest for 30 seconds before slicing to prevent cheese from escaping.
If using corn tortillas, warm them first to make them pliable and use two per serving for stability.
This nourishing smashburger quesadillas recipe is sure to be a staple in your kitchen. Enjoy every moist, high protein slice — it is perfect for breakfast or as a wholesome snack any time.
FAQs about Recipes
Can I freeze assembled quesadillas?
Yes. Prepare fully and cool, then wrap tightly and freeze for up to one month. Reheat in a 350°F oven until hot and crisp.
What is the best type of ground beef to use?
Use 80/20 ground beef for best flavor and juiciness. Leaner beef can be used but may require a small splash of oil to prevent dryness.
Tags
Smashburger Quesadillas
This Smashburger Quesadillas recipe makes perfectly juicy, tender, and flavorful steak every time! Serve with potatoes and a side salad for an unforgettable dinner in under 30 minutes.
Ingredients
Main
Instructions
Heat the Pan
Preheat a heavy skillet or griddle over medium-high heat until hot but not smoking. Cast iron is ideal for even browning.
Season and Portion
Divide beef into four portions. Lightly season each with salt, pepper, and garlic powder without overworking the meat.
Press the Beef onto the Tortilla
Place a tortilla flat, add a small handful of beef on one half, and smash thinly with a spatula to create even contact for caramelization.
Cook Beef Side Down
Place tortilla onto the hot skillet with the beef side down and cook undisturbed for 2 to 3 minutes until well browned.
Flip, Add Cheese and Fold
Flip the tortilla so the cooked beef faces up, sprinkle cheese, fold over, and press gently to seal.
Grill Both Sides Until Crispy
Cook 1 to 2 minutes per side until the tortilla is golden and the cheese fully melts. Adjust heat to prevent burning.
Slice and Serve
Let rest 30 seconds, then slice into wedges and serve with pickles, diced onion, and your favorite sauces.
Last Step: Please leave a rating and comment letting us know how you liked this recipe! This helps our business to thrive and continue providing free, high-quality recipes for you.
Nutrition
Did You Make This?
Leave a comment & rating below or tag
@royalrecipe on social media!
Categories:
You might also like...
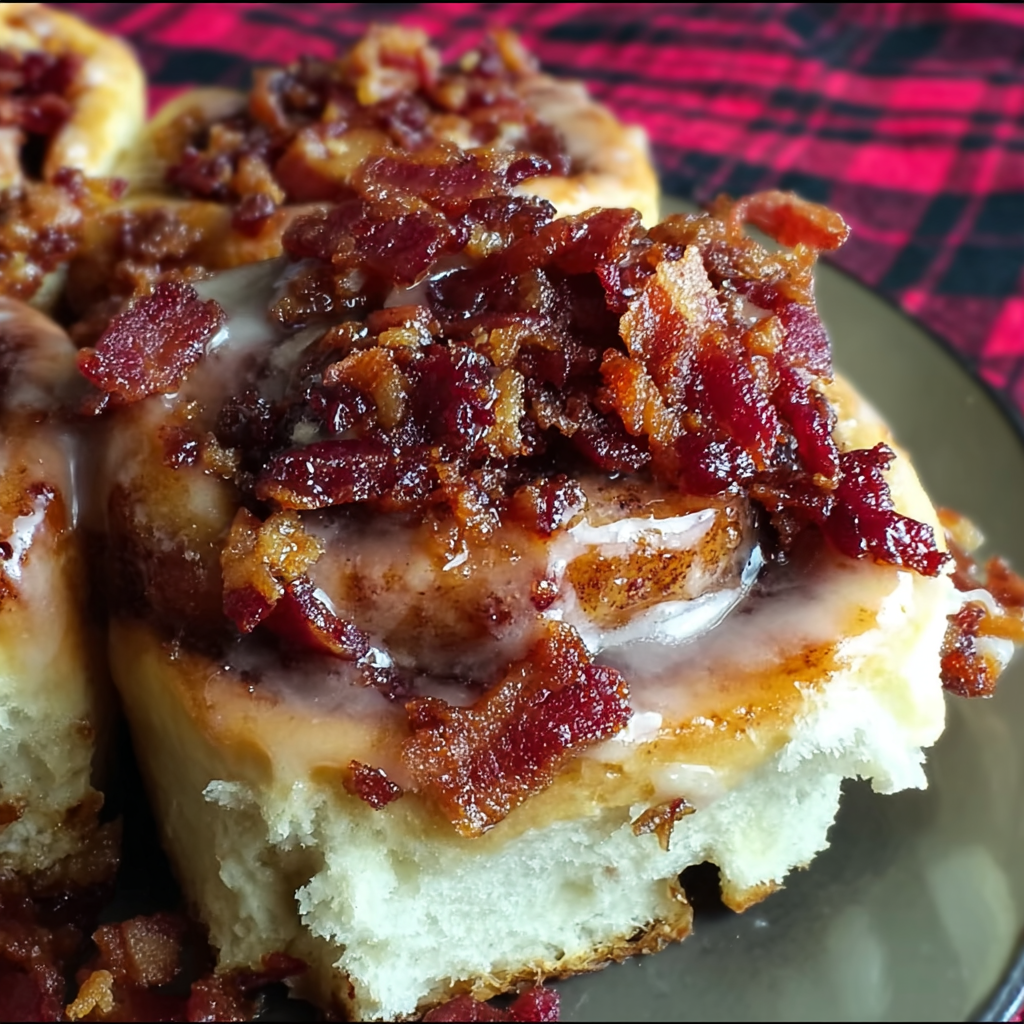
Easy Maple Bacon Cinnamon Rolls
Store-bought cinnamon rolls get a gourmet upgrade with candied bacon and a maple syrup glaze for the perfect fall breakfast—quick, indulgent, and crowd-pleasing.

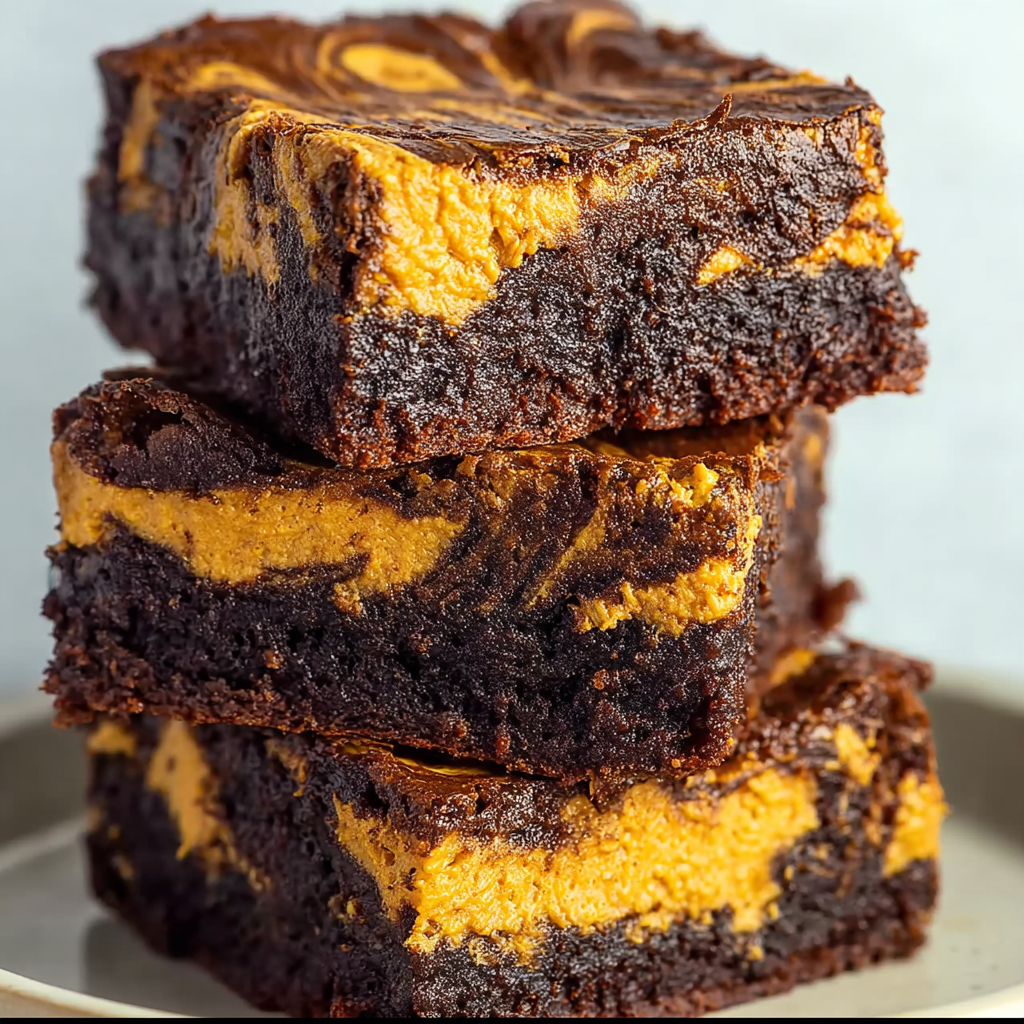
Bacon Cheeseburger Grilled Cheese Casserole
A decadent comfort-food mashup: layers of bread, savory cheeseburger filling, and gooey melted cheese baked until golden. Perfect for family dinners and potlucks.
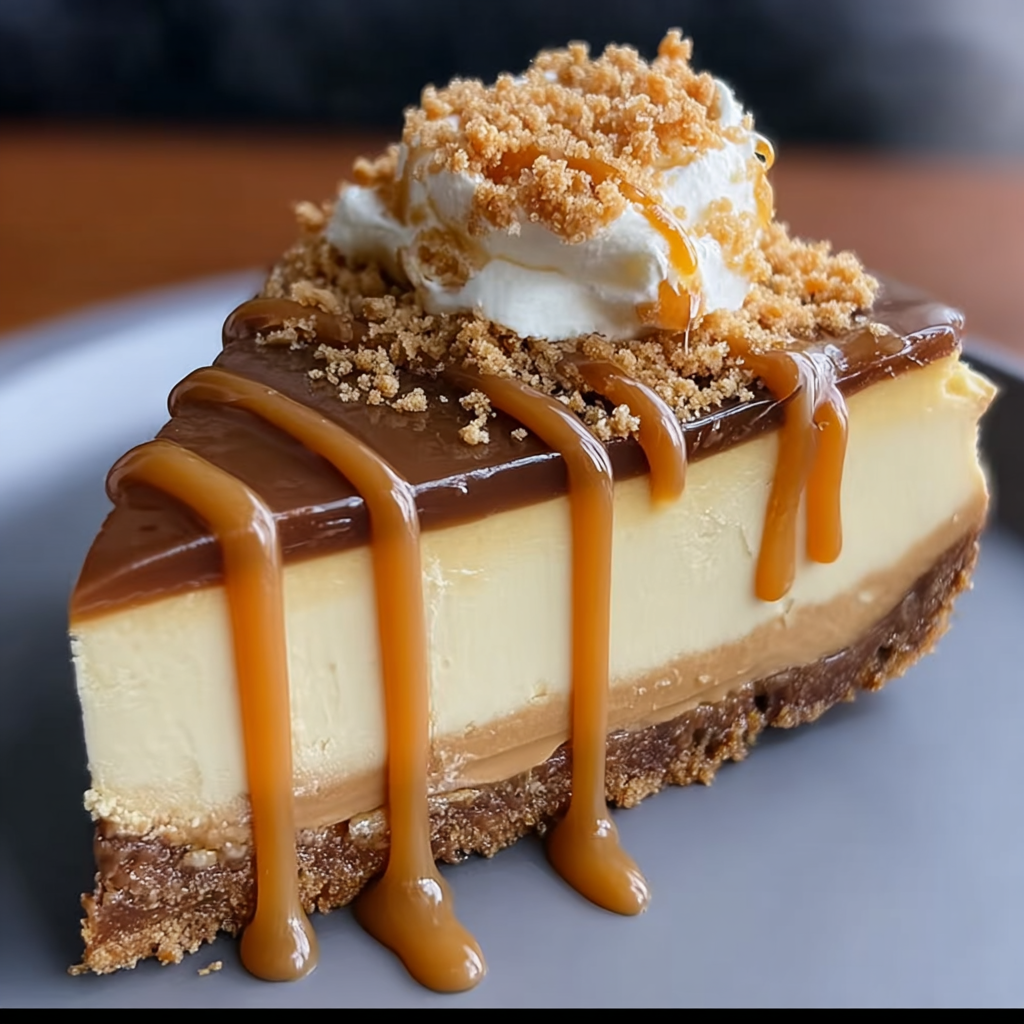
Cookie Butter Caramel Cheesecake
A velvety cheesecake infused with cookie butter on a Biscoff crust, finished with warm caramel sauce and cloudlike whipped cream. The perfect indulgence for cookie butter lovers.
Did You Make This?
Leave a comment & rating below or tag @royalrecipe on social media!
Rate This Recipe
Share This Recipe
Enjoyed this recipe? Share it with friends and family, and don't forget to leave a review!
Comments (1)
This recipe looks amazing! Can't wait to try it.
Comments are stored locally in your browser. Server comments are displayed alongside your local comments.
Hi, I'm Natalie!
What's Popular
Get My 30-Minute Meals email series!
Quick and easy dinner ideas delivered to your inbox.